
前回記事にてFusion360でPythonスクリプトを使いメッセージボックスを表示させました。

今回は実際にPythonスクリプトを使ってスケッチに円を描く方法について紹介します。
スケッチ、中心点、半径で円を描く
Fusion360のドキュメントにサンプルコードとしてスケッチ、中心点、半径で円を描く方法が記載されています。

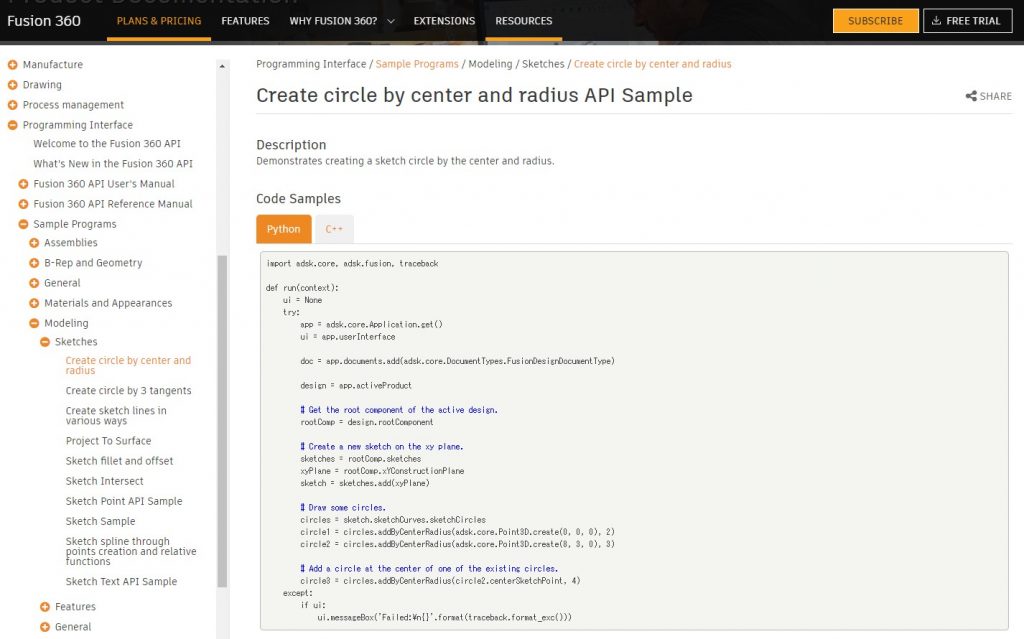
import adsk.core, adsk.fusion, traceback

def run(context):
    ui = None
    try:
        app = adsk.core.Application.get()
        ui = app.userInterface

        doc = app.documents.add(adsk.core.DocumentTypes.FusionDesignDocumentType)

        design = app.activeProduct

        # Get the root component of the active design.
        rootComp = design.rootComponent

        # Create a new sketch on the xy plane.
        sketches = rootComp.sketches
        xyPlane = rootComp.xYConstructionPlane
        sketch = sketches.add(xyPlane)

        # Draw some circles.
        circles = sketch.sketchCurves.sketchCircles
        circle1 = circles.addByCenterRadius(adsk.core.Point3D.create(0, 0, 0), 2)
        circle2 = circles.addByCenterRadius(adsk.core.Point3D.create(8, 3, 0), 3)

        # Add a circle at the center of one of the existing circles.
        circle3 = circles.addByCenterRadius(circle2.centerSketchPoint, 4)
    except:
        if ui:
            ui.messageBox('Failed:\n{}'.format(traceback.format_exc()))
実行結果の確認
書かれているコードのままPythonスクリプトを作り、実行してみましょう。
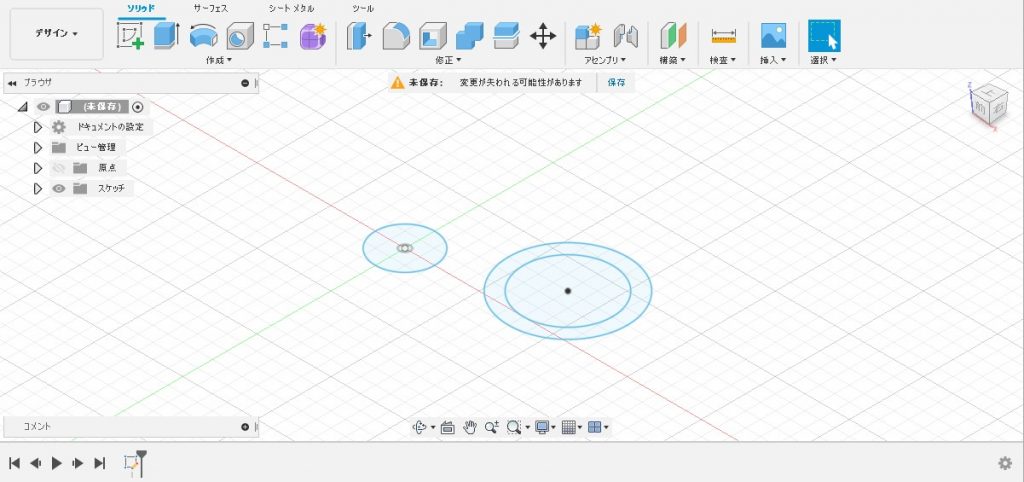
全部で3つの円が作成されました。
プログラムの詳細
プログラムの中身を見ながらどんな事をしているのか確認していきます。
おまじない
1行目~11行目と28行目以降はスケッチのデザインではまずはおまじないとして覚えておきましょう。(厳密には違うのですがうまく説明できないのとメインの処理ではないのでとりあえずスキップします)
import adsk.core, adsk.fusion, traceback

def run(context):
    ui = None
    try:
        app = adsk.core.Application.get()
        ui = app.userInterface

        doc = app.documents.add(adsk.core.DocumentTypes.FusionDesignDocumentType)

        design = app.activeProduct
…
    except:
        if ui:
            ui.messageBox('Failed:\n{}'.format(traceback.format_exc()))
おそらく下のような構造になっていると思いますが現時点では僕の勝手な考えで合っているかは不明です。
App(Fusion360アプリケーション自体)
┣FusionDesignDocument(作業スペースが「デザイン」)
┗Produc
スケッチを作る
13行目~19行目ではXY平面上に新しいスケッチを作ります。
        # Get the root component of the active design.
        rootComp = design.rootComponent

        # Create a new sketch on the xy plane.
        sketches = rootComp.sketches
        xyPlane = rootComp.xYConstructionPlane
        sketch = sketches.add(xyPlane)
14行目の「rootComponent」で現在のデザインの入れ物(表現が難しい)を取得します。
17行目の「sketches」でスケッチ群を取得します。
18行目の「xYConstructionPlane」でXY平面を取得します。
19行目の「add()」でXY平面上のスケッチを作成します。
円を描く
21行目~27行目では作ったスケッチに円を描きます。
        # Draw some circles.
        circles = sketch.sketchCurves.sketchCircles
        circle1 = circles.addByCenterRadius(adsk.core.Point3D.create(0, 0, 0), 2)
        circle2 = circles.addByCenterRadius(adsk.core.Point3D.create(8, 3, 0), 3)

        # Add a circle at the center of one of the existing circles.
        circle3 = circles.addByCenterRadius(circle2.centerSketchPoint, 4)
22行目の「sketchCurves」で曲線群「sketchCircles」で円群を取得します。
23(24)行目の「addByCenterRadius()」で円を作成します。(第一引数に点要素、第二引数に半径を指定します)
「adsk.core.Point3D.create()」で空間上の点を作成します。(第一引数に座標のX値、第二引数にY値、ダ第三引数にZ値を指定します)
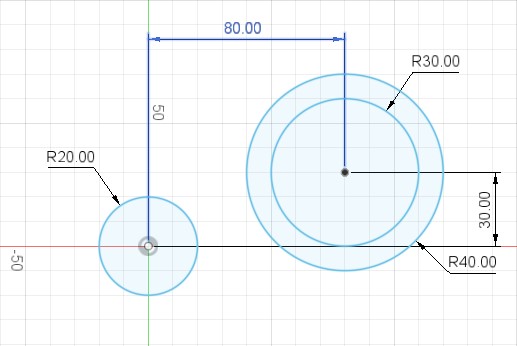
これで原点を中心とした半径20mmの円とXが80mm、Yが30mmの座標値を中心とした半径30mmの円をXY平面上に作成しました。
※Pythonスクリプトで入力する値はmm単位ではなく10mm(1cm)単位のようなので「8」と指定すると「80mm」の事になる。(原因は不明)
27行目は「centerSketchPoint」で半径30mmで作成した円の中心を使って半径40mmの円をXY平面上に作成しました。
まとめ
いかがでしたか?
Fusion360でモデリングしていれば必ず使うと思われるスケッチ上で円の中心と半径を指定して円を作成する方法をPythonスクリプトで実行する方法を学びました。
ポイントとしては円の中心点を「adsk.core.Point3D.create()」で座標値指定できる事と「centerSketchPoint」で同心円を作成できる事です。
円を作成する「addByCenterRadius()」の第一引数は点要素なのでほかの形状から点要素を取得できればそれを中心とした円を作成する事はできそうです。
それと数値の指定では1mm単位ではなく10mm(1cm)単位になる事です。
今後もドキュメントに書かれているサンプルソースについて紹介していこうと思います。


コメント