
前回記事の続きです。

MakeCode Arcade 1st Birthday Update!
「New Sprite Flags」まで紹介したので今回は「Asset Editor」からです。
Asset Editor
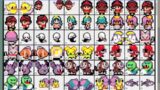
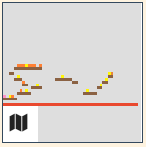
The next time you open up a game, you may notice a new button on the top of the Arcade editor screen called “Assets”:
Asset Editor
あなたが次回のゲームを開くと「アセット」を呼び出す新しいボタンがアーケードエディタ画面のトップに掲示される:
渡り鳥のてけとー翻訳

今回の更新でアーケードエディタトップのメニューに「アセット」が追加されました。
This is a view that will allow you to see all the assets in your game.
Asset Editor
これはあなたのゲームのすべてのアセットを見ることを可能にするビューである。
渡り鳥のてけとー翻訳
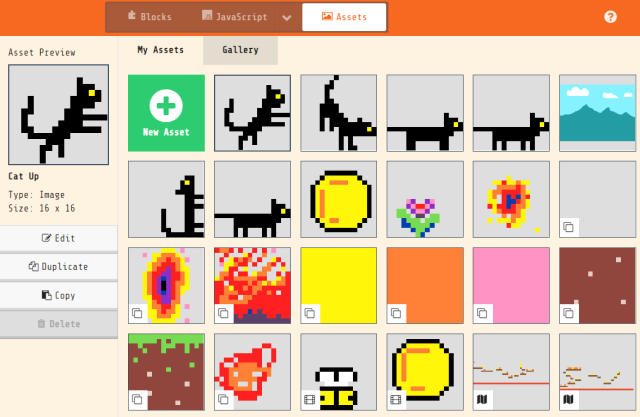
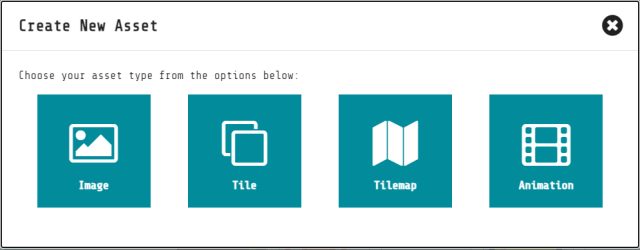
An “Asset” can be(「アセット」になりうる):
Asset Editor(渡り鳥のてけとー翻訳)
・An image – for a Sprite, Projectile, Background, Dialog Frame
Asset Editor(渡り鳥のてけとー翻訳)
・イメージ – スプライト、発射体、背景、ダイアログフレーム
・A tile – denoted by the stacked boxes icon
Asset Editor(渡り鳥のてけとー翻訳)
・タイル – 重なった四角アイコンで表示される

・An animation – denoted by the film icon (animates when you hover your mouse over it)
Asset Editor(渡り鳥のてけとー翻訳)
・アニメーション – フィルムアイコンで表示される(マウスをその上で停止するとアニメーションする)
・A tile map – denoted by the map icon
Asset Editor(渡り鳥のてけとー翻訳)
・タイルマップ – マップアイコンにより表示される
Why did we create this view? For a couple reasons:
Asset Editor
・Easier Asset Management – as people were creating bigger and bigger games with a lot of different assets, it was getting difficult for them to navigate through the code to find specific assets to edit or copy.
・No-code Modding – for our very newbie students who are just getting into coding and game development, we wanted to provide an option for them to take an existing game and mod it, without having to parse through lots of code blocks which can be overwhelming.
私達はなぜこのビューを作成したか?理由は二つ:
渡り鳥のてけとー翻訳
・容易なアセット管理 – たくさんの種類のアセットによってますます大きいゲームを作成していると、編集またはコピーで特定のアセットを見つけるためにコードの中をナビゲートする事が更に難しくなっていた。
・ノーコードで改造 – 初心者の学生がコードとゲーム開発の中から正しく受け取るために、私たちは既存のゲームを改造するオプションの提供を求めた、圧倒的な山ほどあるコードブロックの中を解析することなく。
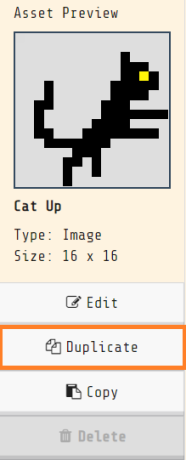
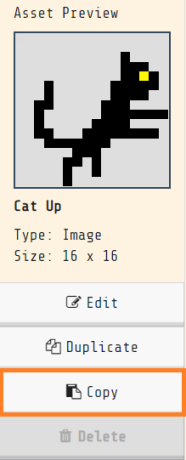
In the Asset Editor view, you can:
Asset Editor(渡り鳥のてけとー翻訳)
アセットエディタビューでできること:
・Create a new asset by clicking on the green plus (+) icon and selecting the type of asset you want to create.
Asset Editor(渡り鳥のてけとー翻訳)
・緑色のプラス(+)アイコンをクリックしてアセットタイプを選択すると新しいアセットを作れます。
・Edit an existing asset by clicking on the asset and selecting the Edit button.
Asset Editor(渡り鳥のてけとー翻訳)
・アセットを選択して「編集」ボタンをクリックすると既存のアセットを編集します。

・Duplicate an existing asset which will make a copy of the asset and put in your Assets view.
Asset Editor(渡り鳥のてけとー翻訳)
・「複製する」で既存のアセットのコピーを作り、アセットビューに置きます。
・Copy an existing asset to your clipboard which will actually copy the image, hold it in your computer’s memory, and then allow you to paste it into a blank image editor canvas.
Asset Editor(渡り鳥のてけとー翻訳)
・「コピー」は既存アセットの実際のイメージをクリップボードにコピーし、コンピューターメモリに保持し、ブランクのイメージエディタキャンバスにそれを貼り付け可能にする。
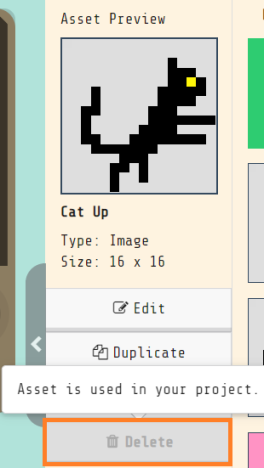
・Delete an existing asset – note that this button is disabled if the asset is being used in your program.
Asset Editor(渡り鳥のてけとー翻訳)
・既存アセットを削除しなさい – 注 このボタンはアセットがプログラムで使われていると使用不可にされる。
As well as the “Assets” button at the top of the screen, you can also get into the Asset Editor view from any of the image editors.
Asset Editor
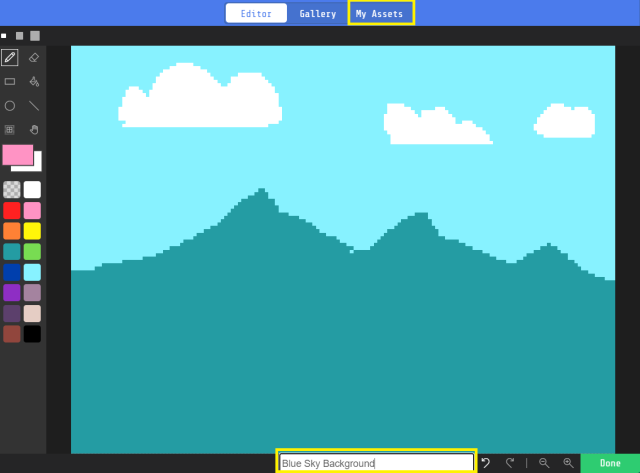
You’ll notice that there’s a new “My Assets” tab at the top of the image editor which allows you to select assets from your asset library.
And there’s also a field for you to name your assets.
画面トップの「アセット」ボタンだけでなく、だれでもイメージエディターからアセットエディタービューに入ることが出来る。
渡り鳥のてけとー翻訳
あなたは、アセットライブラリからアセットを選ぶ事を可能にするイメージエディターのトップに新しい「My Assets」タブがあることに気づく。
それとアセットの名前を付けるフィールドもある。
There’s one thing to note about the new Asset Editor feature for those who program in JavaScript and Python.
Asset Editor
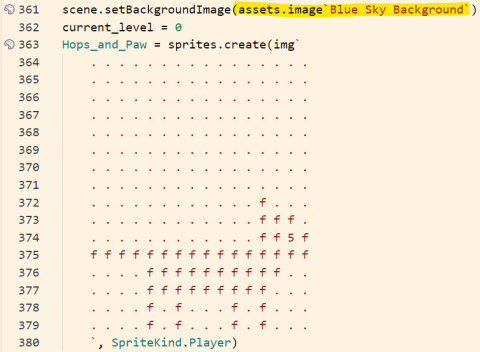
Named assets are treated differently in code.
The ascii representation is no longer embedded in the code, but rather part of the assets namespace and stored in a separate project file.
JavaScriptとPythonのプログラムを作るためのアセットエディター機能について1つのノートがある。
渡り鳥のてけとー翻訳
名前を付けたアセットはコードにおいて異なって扱われる。
アスキー表現のコードへの埋め込みは長くなく、むしろアセットの名前空間の一部は別個のプロジェクトファイルに分けて蓄えられる。
新たに追加されたアセット機能はプロジェクトで使われるすべてのイメージを管理してくれる優れものですね。
プログラムが大きくなってくるとどんなイメージを作ってどれを使っているか把握することが大変だったのでこの機能は力を入れただけあってすごく便利になりました。

Gallery in Tile Editor
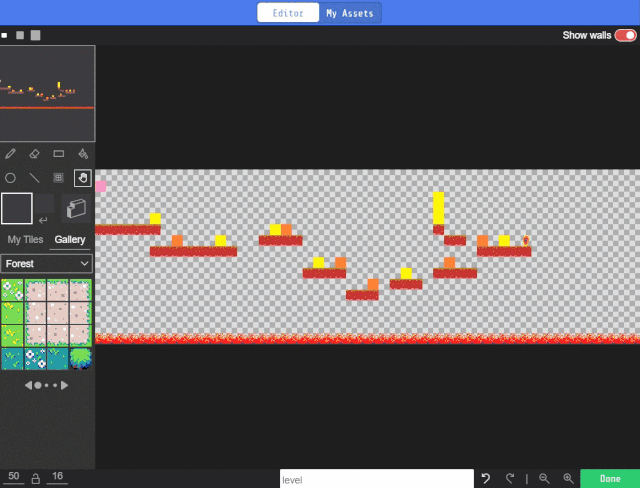
Another frequently requested feature was to bring the Gallery view into the Tile Editor so when you are creating your own custom tiles, you can start with one of the existing tiles and just tweak it, rather than having to create your own tiles from scratch.
Gallery in Tile Editor
別の品番に要望された機能は、カスタムタイルをタイルエディタにギャラリービューを作り、既存のタイルとそれを引いて開始し、タイルから掘り出して作成できる。
渡り鳥のてけとー翻訳
はい、翻訳がひどすぎますねorz
まったくもって箇条書きにでもしてくれたらどれだけ助かっただろうか・・・
おそらく「タイルエディタから選択中のタイルでイメージエディタが出来て、ギャラリーからの選択もできるようになったよ」って意味かと思います。
エディター間の行き来が楽になりました。
Support for GitHub Extensions in subfolders
For all of you extension authors out there, we’ve hopefully made your lives a bit easier!
Support for GitHub Extensions in subfolders
Before, you could only author 1 extension or set of tutorials from an individual repo.
Now you can publish multiple extensions and tutorials all from one GitHub repo.
This is handy if you want to publish a set of custom blocks and a set of related tutorials that go with it.
You can see our documentation about writing custom extensions and tutorials.
すべての拡張作品が待ち望み作られた活動を少し容易にした!
渡り鳥のてけとー翻訳
前は、作品には1つの拡張またはチュートリアルに個々のrepoができただけである。
今や、1つのGihHubのrepoから複数の拡張とチュートリアルをすべて発表できる。
もし カスタムなブロックのセットと関連したチュートリアルのセットを発表したいならば、これは便利である。
あなたは、カスタムな拡張とチュートリアルを書くことについてドキュメントを見る事ができる。
自作の拡張機能についての更新情報のようです。
内容が難しく、理解が出来ていないですがここら辺をやってる方たちなら理解できるのかな?
僕もそんなレベルになれるようになりたいです。
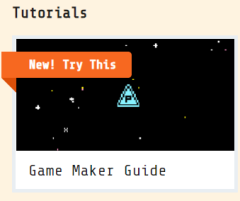
New Tutorial Format
For those of you paying close attention, you may have noticed a new “Game Maker Guide” card appear on the Arcade Home page in December.
New Tutorial Format
注意深く支給された通知を持つ、12月のArcadeのホームページに新しい「Game Maker Guide」カードが現れた。
渡り鳥のてけとー翻訳
We are experimenting with a new format for tutorials where there are a series of tutorial activities which build upon each other through progressive levels of difficulty.
New Tutorial Format
This helps provide a bit more guidance to students on a recommended progression path It also helps keep individual tutorials shorter.
私たちは、活動が困難な進捗度合を一連のチュートリアルの新しいフォーマットによって実験している。
これは、個々のチュートリアルをより短くしておくことを手助けする推奨された進捗パスの学生にもう少し提供するのに役立っている。
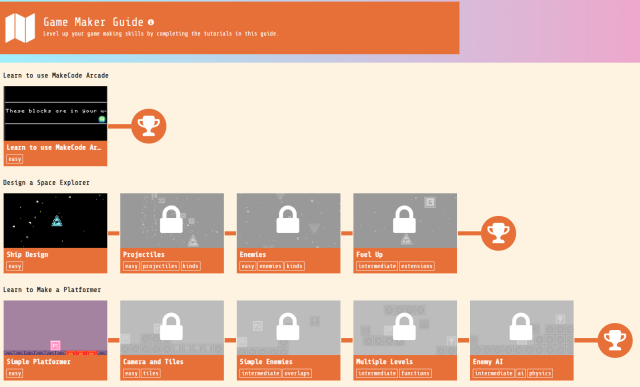
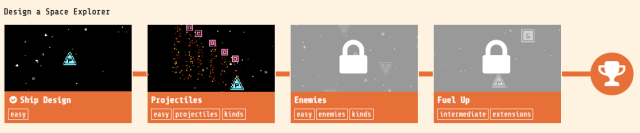
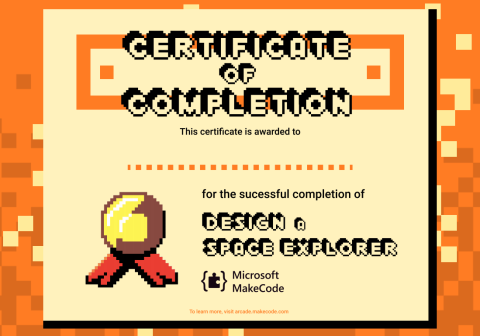
Right now we have 2 learning paths available in the Game Maker Guide – Design a Space Explorer game, and Learn to Make a Platformer.
New Tutorial Format
Students must complete a sequence of tutorials in order – once they complete a tutorial, the next tutorial in the series unlocks.
ちょうどいま、私たちは「Game Maker Guide」で利用できる2つの学習パスを持っている – Design a Space ExplorerとLearn to Make a Platformer。
渡り鳥のてけとー翻訳
学生は一連の指導書を順番に完成しなければならない – いったんそれらが指導書を完成したら、シリーズの次のチュートリアルの鍵が開く。
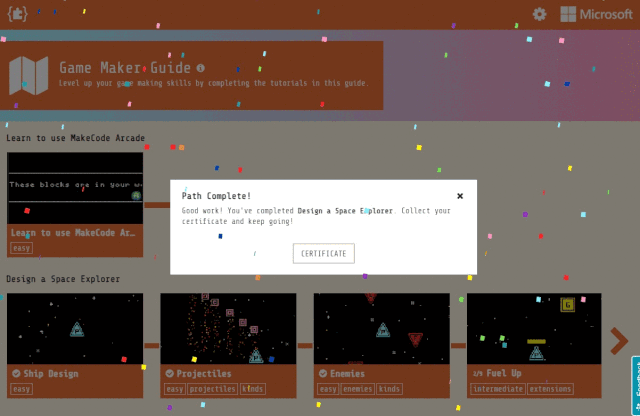
In addition to a progression path, we’re also experimenting with gamification elements.
New Tutorial Format
When a student completes a learning path, they receive confetti and a certificate.
進捗パスに加えて、私たちはまた、ゲーム化要素で実験している。
渡り鳥のてけとー翻訳
学生が学習パスを完成するとき、紙吹雪と証明書を受け取る。
新しいチュートリアルのフォーマットについて説明しています。
順番に小さなチュートリアルを順番に進められるようになっています。
また、チュートリアル完了後はお祝いがあるのでゲーム感覚で学習を進められそうです
最後に(タイトルなし)
This new tutorial format is still a work in progress and we’d love your feedback.
最後に
If you find any issues, or have suggestions, please log them on GitHub.
If you have questions, or would like to participate in the MakeCode community, please join the Forum or follow us on social @MSMakeCode.
Happy Making and Coding!
この新しいチュートリアルのフォーマットは、進捗においてまだ作品であり、私たちはあなたのフィードバックを愛している。
渡り鳥のてけとー翻訳
もしどのような問題でも見つけるか、提案を持っているならば、どうぞGitHubに記録してください。
もしあなたが質問を持っているか、またはMakeCodeコミュニティに参加したいならば、どうぞ、フォーラムに参加するか、ソーシャル@MSMakeCodeをフォローしてください。
楽しい制作とコーディング!
いつも通りの締めの挨拶です。
フォーラムやTwitterで開発のフィードバックが可能です。
まとめ
全体的にイメージエディタとその周辺関係の大幅な改善が行われた事がわかりました。
また、熱量もすごく翻訳作業がかなり手こずりました。(英語力の低さは自覚しているけどできれば箇条書きでどんな内容か紹介されているとうれしい)


コメント