前回記事では長方形を描く方法について紹介しました。
今回はスケッチでのフィレットとオフセットを使って描く方法について紹介します。
フィレットとオフセットを使う
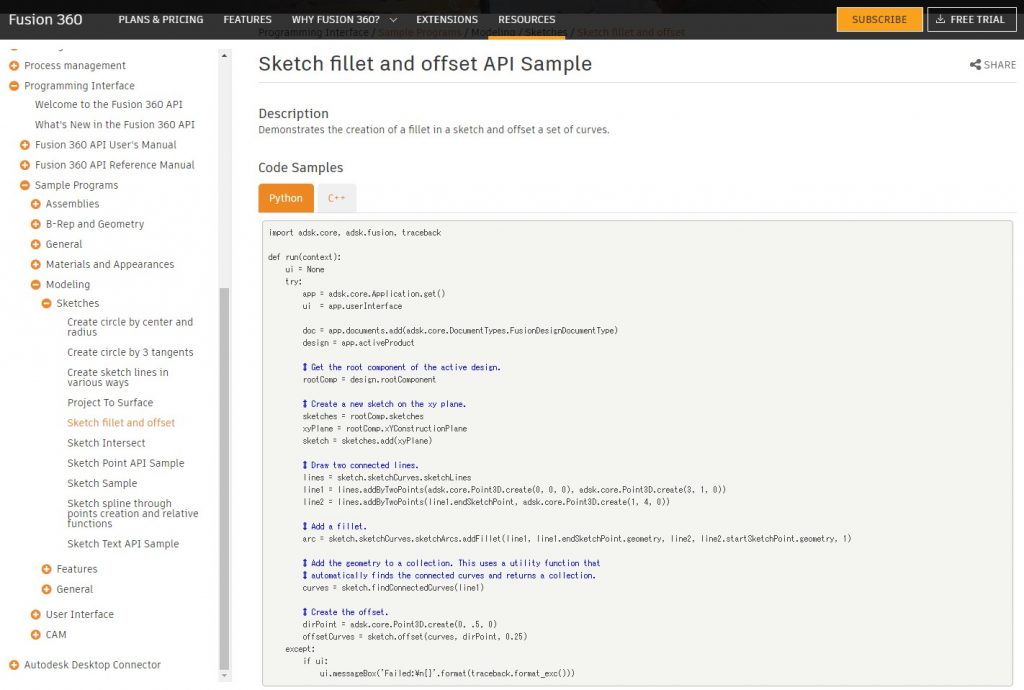
Fusion360のドキュメントにサンプルコードにフィレットとオフセット使う方法が記載されています。

import adsk.core, adsk.fusion, traceback

def run(context):
    ui = None
    try:
        app = adsk.core.Application.get()
        ui  = app.userInterface

        doc = app.documents.add(adsk.core.DocumentTypes.FusionDesignDocumentType)
        design = app.activeProduct

        # Get the root component of the active design.
        rootComp = design.rootComponent

        # Create a new sketch on the xy plane.
        sketches = rootComp.sketches
        xyPlane = rootComp.xYConstructionPlane
        sketch = sketches.add(xyPlane)

        # Draw two connected lines.
        lines = sketch.sketchCurves.sketchLines
        line1 = lines.addByTwoPoints(adsk.core.Point3D.create(0, 0, 0), adsk.core.Point3D.create(3, 1, 0))
        line2 = lines.addByTwoPoints(line1.endSketchPoint, adsk.core.Point3D.create(1, 4, 0))

        # Add a fillet.
        arc = sketch.sketchCurves.sketchArcs.addFillet(line1, line1.endSketchPoint.geometry, line2, line2.startSketchPoint.geometry, 1)

        # Add the geometry to a collection. This uses a utility function that
        # automatically finds the connected curves and returns a collection.
        curves = sketch.findConnectedCurves(line1)

        # Create the offset.
        dirPoint = adsk.core.Point3D.create(0, .5, 0)
        offsetCurves = sketch.offset(curves, dirPoint, 0.25)
    except:
        if ui:
ui.messageBox('Failed:\n{}'.format(traceback.format_exc()))実行結果の確認
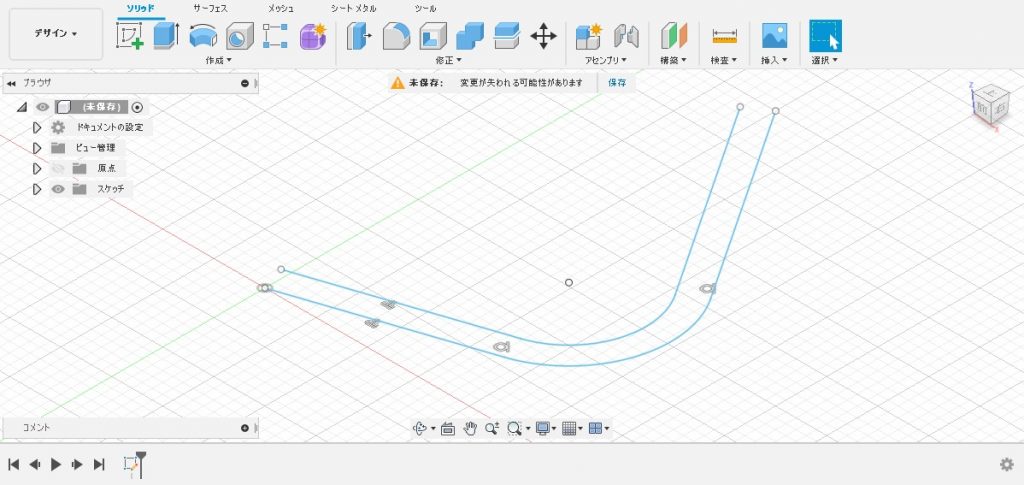
書かれているコードのままPythonスクリプトを作り、実行してみましょう。

プログラムの詳細
プログラムの中身を見ながらどんな事をしているのか確認していきます。
おまじない
1行目~10行目と35行目以降はスケッチのデザイン定番のおまじないです。
import adsk.core, adsk.fusion, traceback

def run(context):
    ui = None
    try:
        app = adsk.core.Application.get()
        ui = app.userInterface

        doc = app.documents.add(adsk.core.DocumentTypes.FusionDesignDocumentType)
        design = app.activeProduct
…
    except:
        if ui:
            ui.messageBox('Failed:\n{}'.format(traceback.format_exc()))
スケッチを作る
12行目~18行目ではXY平面上に新しいスケッチを作ります。(詳細は省略します)
        # Get the root component of the active design.
        rootComp = design.rootComponent

        # Create a new sketch on the xy plane.
        sketches = rootComp.sketches;
        xyPlane = rootComp.xYConstructionPlane
        sketch = sketches.add(xyPlane)
2つの直線を描いてつなげる
20行目~23行目では2つの直線を描いてつなげます。(詳細は省略します)
        # Draw two connected lines.
        lines = sketch.sketchCurves.sketchLines
        line1 = lines.addByTwoPoints(adsk.core.Point3D.create(0, 0, 0), adsk.core.Point3D.create(3, 1, 0))
        line2 = lines.addByTwoPoints(line1.endSketchPoint, adsk.core.Point3D.create(1, 4, 0))
フィレットを使う
25、26行目では作成した2つの直線の角を面取り(フィレット)します。
        # Add a fillet.
        arc = sketch.sketchCurves.sketchArcs.addFillet(line1, line1.endSketchPoint.geometry, line2, line2.startSketchPoint.geometry, 1)
26行目の「sketchArcs」で弧群、「addFillet()」で面取りします。(第一引数に1つ目の線要素、第二引数に1つ目の線上の面取りする点要素(サンプルでは終点)、第三引数に2つ目の線要素、第四引数に2つ目の線上の面取りする点要素(サンプルでは始点)、第五引数に半径値を指定します)
曲線を探す
28~30行目では作成した曲線を探します。
        # Add the geometry to a collection. This uses a utility function that
        # automatically finds the connected curves and returns a collection.
        curves = sketch.findConnectedCurves(line1)
30行目の「findConnectedCurves()」で曲線を探します。(第一引数に曲線の一部の要素を指定します)
作成した曲線は直線2つ(line1、line2)と面取り(arc)の合計3つの要素になっているため、これらをまとめて1つの要素(curves)として扱うためにこの処理をしています。
オフセットする
32~34行目ではまとめた曲線をオフセットします。
        # Create the offset.
        dirPoint = adsk.core.Point3D.create(0, .5, 0)
        offsetCurves = sketch.offset(curves, dirPoint, 0.25)
33行目はオフセットする方向の点要素を作っています。
34行目の「offset()」でオフセットします。(第一引数にオフセットする要素、第二引数にオフセット方向を示す点要素、第三引数にオフセット距離を指定します)
オフセット方向を示す点要素が内側となる座標で作成されているため、このサンプルでは内側に向かって2.5mmオフセットします。
まとめ
スケッチのトリムとオフセットについて紹介しました。
今回のワンポイントとしては「findConnectedCurves()」でまとめた要素を1つの要素として扱う方法です。
手作業では何気なくやれてしまうと思いますがスクリプトではしっかり意識して組み立てないと一部だけしかされなかったなんて事になりそうです。


コメント