チュートリアルの紹介第八弾「Paddle」のその2です。
その1ではボールを作りました。
左のパドルもキャラクターと動きを作りました。
その2では残りの工程を行いゲームを完成させます。
[8/15]左のパドルに制限をかける
左のパドルに制限をかけます。
Add code to set the left position of left_paddle to 0.
Also, put in more code to make left_paddle stay in screen.
【渡り鳥のてけとー翻訳】
「left_paddle」の左のポジションを0に設定するため、コードを追加しなさい。
また、「left_paddle」をスクリーンに留めるため、さらにコードを追加しなさい。
ヒントを見ると完成イメージが表示されます。
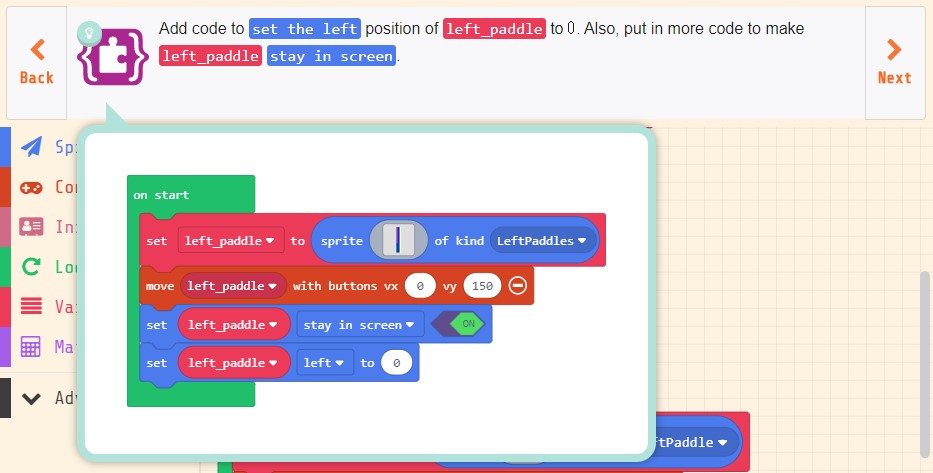
「Sprites」の「set mySprite stay in screen」を配置し、「mySprite」を「left_paddle」、「OFF」を「ON」に変更します。
「Sprites」の「set mySprite x」を配置し、「mySprite」を「left_paddle」、「x」を「left」に変更します。
むぅ、左のパドルがチュートリアルの完成イメージのようにスクリーン左ぎりぎりに張りつかない。
左のパドルを描くステップにて16×16じゃなく3×16などキャラクターのサイズに合わせて設定すべきだったかなと思います。
これで左のパドルに制限をかけることができました。
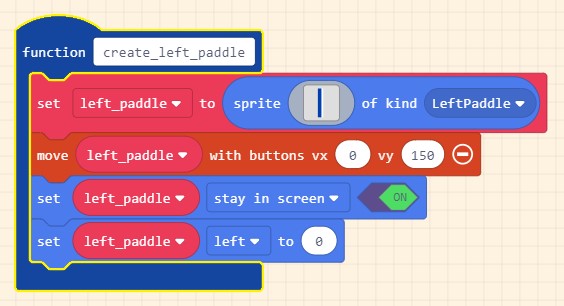
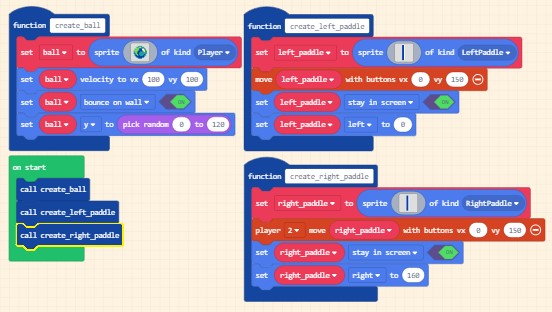
[9/15]左のパドル作成関数を作る
左のパドル作成関数を作ります。
Create a new function, create_left_paddle, and move the code from on start into it.
Keep this function for later.
【渡り鳥のてけとー翻訳】
新しい関数「create_left_paddle」を作り、前のステップのコードを移動して「on start」の中にこの関数を追加しなさい。
この関数を後に取っておきなさい。
ヒントを見ると完成イメージが表示されます。
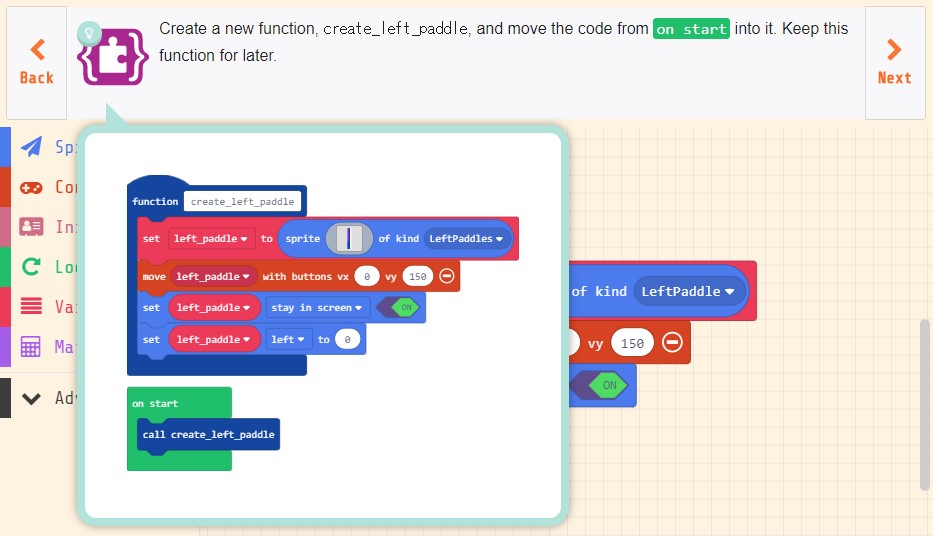
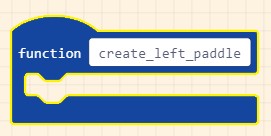
「Advance」「Functions」にて新しい関数「create_left_paddle」を作ります。
「function create_left_paddle」の中に「call create_ball」を除く「on start」の中のブロックを移動します。(2つ目の「set left_paddle to sprite」をドラッグ&ドロップでまとめて移動できます)
ここで気づきました。
ステップ6の関数「create_ball」は関数作るだけで「call create_ball」を「on start」へ配置することは不要だったのでは?と。
ヒントのイメージと実際のブロックに相違があったのはこれが原因のようです。(このことからステップ6は翻訳ミスってそうですね)
しかし先に残りのステップを斜め読みしていって最終的に作った関数を順番に呼んでいることが確認できたのでこのまま続行していきます。
「Functions」の「call create_left_paddle」を「on start」の中に配置します。
これで左のパドル作成関数を作ることができました。
[10/15]右のパドル作成関数を作る
右のパドル作成関数を作ります
Create another function, create_right_paddle, for the right_paddle.
Copy all of the code from the create_left_paddle function and put in this new function.
Change all of the left_paddle variables in the function to right_paddle.
【渡り鳥のてけとー翻訳】
「right_paddle」用の別の関数「create_right_paddle」を作りなさい。
関数「create_left_paddle」のコードすべてをコピーし、この新しい関数に入れなさい。
関数内の変数「left_paddle」をすべて「right_paddle」に変更しなさい。
ヒントを見ると完成イメージが表示されます。
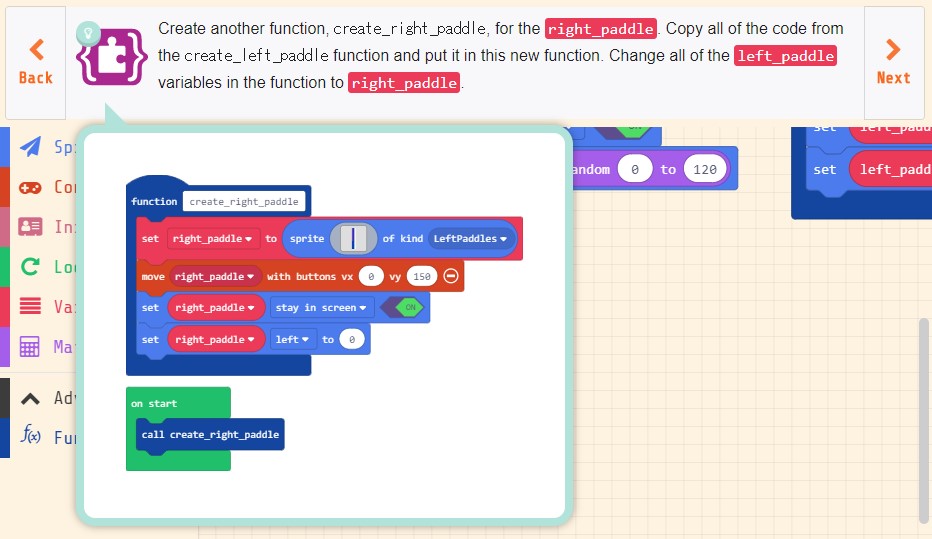
「Advance」「Functions」にて新しい関数「create_right_paddle」を作ります。(関数はコピーできないので新しく作る必要があります)
関数「create_left_paddle」のブロックすべて(4個)をコピーして関数「create_right_paddle」へ配置します。(一度にコピーできないので1ブロック毎4回行います)
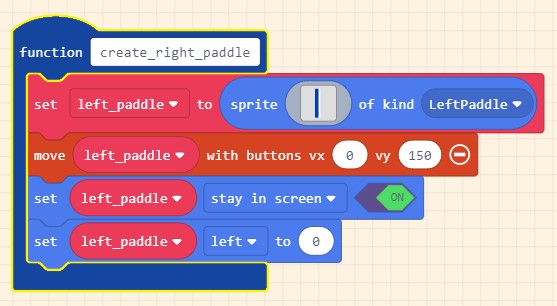
関数「create_right_paddle」内の各ブロックの変数「left_paddle」を「right_paddle」に変更(全4個)します。(1つ目は変数「right_paddle」が存在しないので新しく作成し、2つ目以降は選択から選びます)
これで右のパドル作成関数を作ることができました。

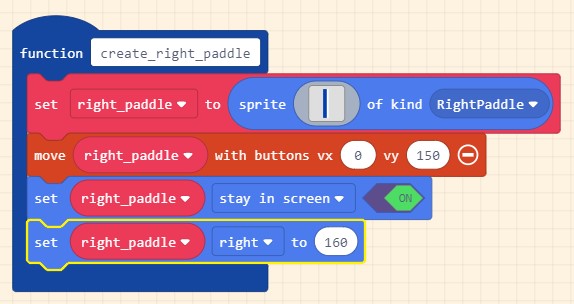
[11/15]右のパドル作成関数をプレイヤー2用にする
右のパドル作成関数をプレイヤー2用にします。
Let’s make some more changes inside of create_right_paddle.
Set the kind of the paddle sprite to RightPaddles.
Change the position setting of the paddle from left to right and set the value to 160.
To make this a 2 player game, replace the move code with a multiplayer move player 2 for right_paddle.
Use the same values for vx and vy.
【渡り鳥のてけとー翻訳】
「create_right_paddle」の中でさらにいくつか変更して作ろう。
パドルスプライトの種類を「RightPaddles」に設定しなさい。
パドルを「left」から「right」、値を160へポジション設定を変更しなさい。
これを2プレイヤーゲームにするために「right_paddle」の移動コードをマルチプレイヤーのプレイヤー2移動に取り替えなさい。
「vx」と「vy」は同じ値を使いなさい。
ヒントを見ると完成イメージが表示されます。
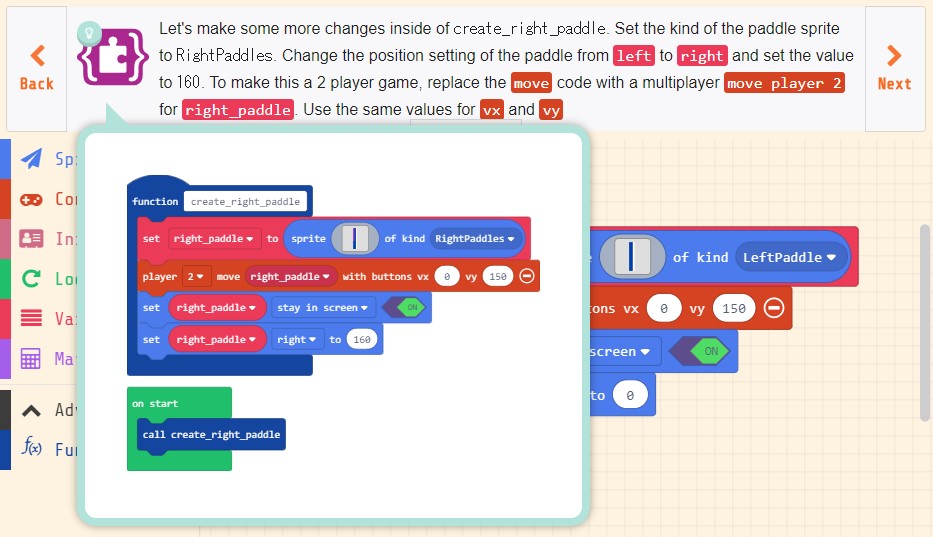
「set right_paddle to sprite」の「LeftPaddles」を「RightPaddles」に変更します。(「RightPaddles」は存在しないので新しく作ります)
「set right_paddle left」の「left」を「right」に変更して値を「160」にします。
「move right_paddle buttons」を「Controller」の「player 2 move mySprite buttons」で置き換え、「mySprite」を「right_paddle」に変更して拡張した「vx」を「0」、「vy」を「150」に設定します。
これで右のパドル作成関数をプレイヤー2用にすることができました。
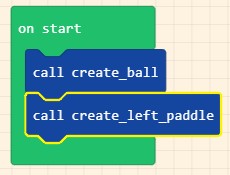
[12/15]全ての関数を呼び出す
全ての関数を呼び出します。
Call all 3 functions in the on start.
【渡り鳥のてけとー翻訳】
「on start」に3つすべての関数を呼びなさい。
ヒントを見ると完成イメージが表示されます。

「on start」へ「Functions」の「call create_ball」「call create_left_paddle」「call create_right_paddle」の3つのブロックを配置します。(本ブログ通りに進めていると「call create_ball」と「call create_left_paddle」はすでに「on start」に配置しているので「call create_right_paddle」だけ配置すればよいです)
これで全ての関数を呼び出すことができました。
[13/15]ボールと左のパドルが重なった時のイベントを作る
「ball」と「left_paddle」が重なった時のイベントを作ります。
Add an event that runs code when ball overlaps with left_paddle.
【渡り鳥のてけとー翻訳】
「ball」と「left_paddle」が重なった時にコードを実行するイベントを追加しなさい。
ヒントを見ると完成イメージが表示されます。
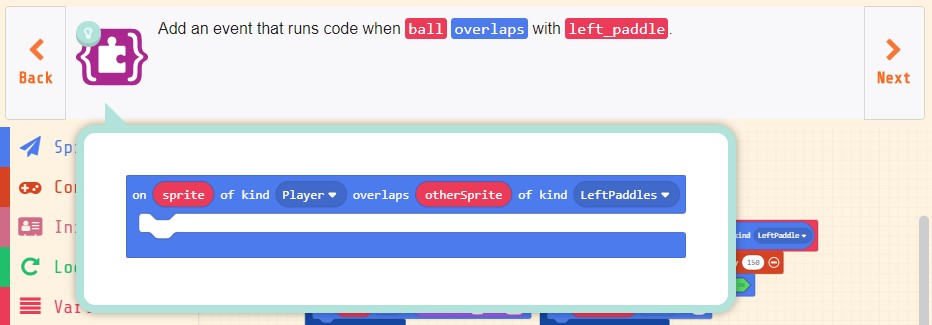
「Sprites」の「on sprite overlaps otherSprite」を配置し、「otherSprite」の種類を「Player」から「LeftPaddles」に変更します。
これでボールと左のパドルが重なった時のイベントを作ることができました。
[14/15]左のパドルでボールを跳ね返す
左のパドルでボールを跳ね返します。
Use the inverse of the horizontal speed (vx) of sprite to simulate the bounce on the paddle… and change score of the player by 1.
【渡り鳥のてけとー翻訳】
パドルで跳ねるをまねるために、スプライトの水平のスピード(vx)の反転を使いなさい。そして「change score」を1にしなさい。
ヒントを見ると完成イメージが表示されます。
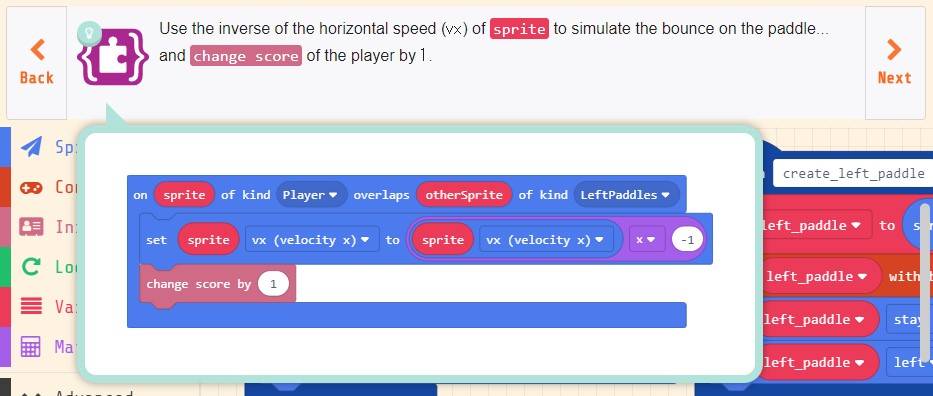
「Sprites」の「set mySprite x」を配置し、「mySprite」を「on sprite overlaps otherSprite」の「sprite」で置き換え、「x」を「vx (velocity x)」に変更します。
方向を反転させるために「Math」の「0 × 0」を「set sprite vx (velocity x)」の「0」へ配置し、後ろの「0」を「-1」に変更します。
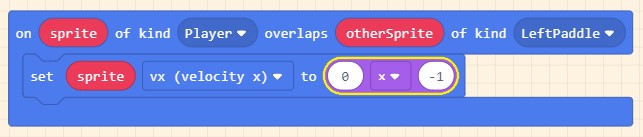
「Sprites」の「mySprite x」を「0 × -1」の「0」に配置し、「mySprite」を「sprite」で置き換え、「x」を「vx (velocity x)」に変更します。
さて、ここまでできてシミュレーターをふと見たところ、右方向に進む(スクリーン左でバウンドした)ボールが左のパドルに触れると上記イベントが発生してしまい、スクリーン左と左パドルの間でバウンドを繰り返してしまいました。
ステップ9で気にしていたスキマがここにきて問題を引き起こしてしまったと思い、急遽左のパドルのスプライトを描きなおしました。
しかし、どんだけスクリーン左と接触した配置で左のパドルを置いてみてもスキマが小さくなるだけで完全に防ぐ事はできませんでした。
これ以上手を加えていませんが水平方向の反転前に判定を置く事で解決できそうです。(今回はそこまで踏み込まずにこれも仕様と割り切ってそのまま進めていきます)
「Info」の「change score」を配置します。
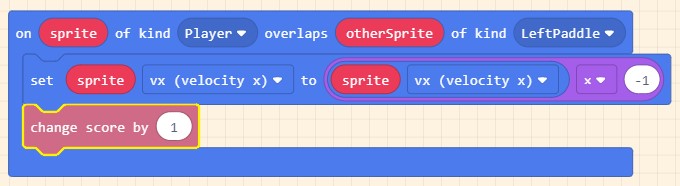
これで左のパドルでボールを跳ね返すことができました。
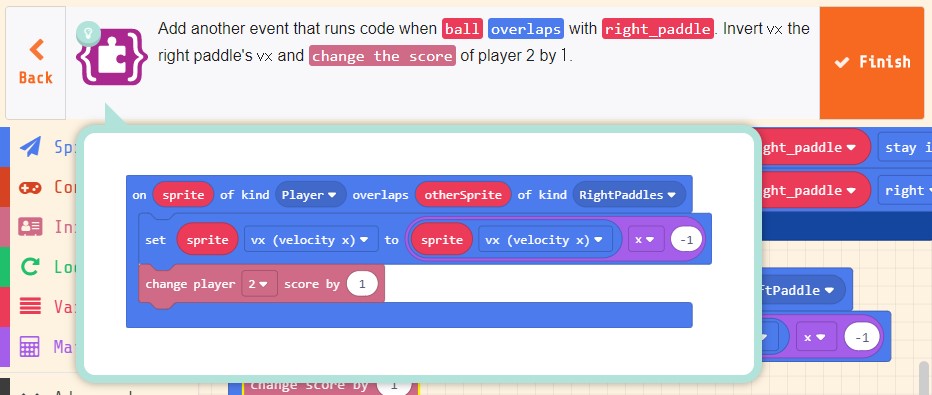
[15/15]右のパドルも左のパドルのようにする
右のパドルも左のパドルのようにします。
Add another event that runs code when ball overlaps with right_paddle.
Invert vx the right paddle’s vx and change the score of player 2 by 1.
【渡り鳥のてけとー翻訳】
「ball」と「right_paddle」が重なった時にコードを実行する別のイベントを追加しなさい。
右のパドルでvxを反転vxにし、プレイヤー2のスコアを1変更しなさい。
ヒントを見ると完成イメージが表示されます。
「on sprite overlaps otherSprite」をコピーし、「LeftPaddles」を「RightPaddles」に変更します。(イベントのブロックをコピーすることでイベント内のブロックもすべてコピーされます)
「change score」を削除し、代わりに「Info」の「change player 2 score」を配置します。
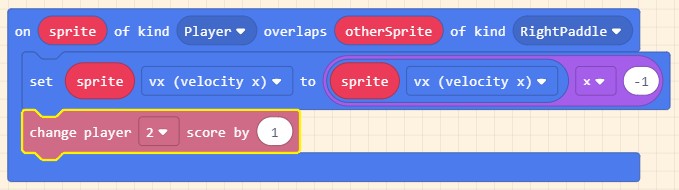
これで右のパドルも左のパドルのようにすることができました。
まとめ
チュートリアル「Paddle」はこれにて完成です。
その2ではプレイヤー2用のブロック「player 2 move mySprite buttons」「change player 2 score」がチュートリアルで初めて登場しました。
「player 2 move mySprite buttons」はプレイヤー2側の十字ボタンに合わせてスプライトを移動させるブロックです。
デバイスを2台準備して繋げる事で右のパドルを動かせるようになります。
「change player 2 score」は単純にプレイヤー2側のスコアを増やすためのブロックです。
これらプレイヤー2用のブロックを使う事で簡単にマルチプレイのゲームを作る事ができそうですね。
更に気になるのがブロックの「2」を1~4に変更できる事です。
最大4人まで同時にマルチプレイを楽しめるのかな?と思うと胸が熱くなりますね。
次のチュートリアルは「Name Tag」です。

コメント