
今回はテキストを描く方法について紹介します。
テキストを描く
Fusion360のドキュメントにサンプルコードにテキストを描く方法が記載されています。

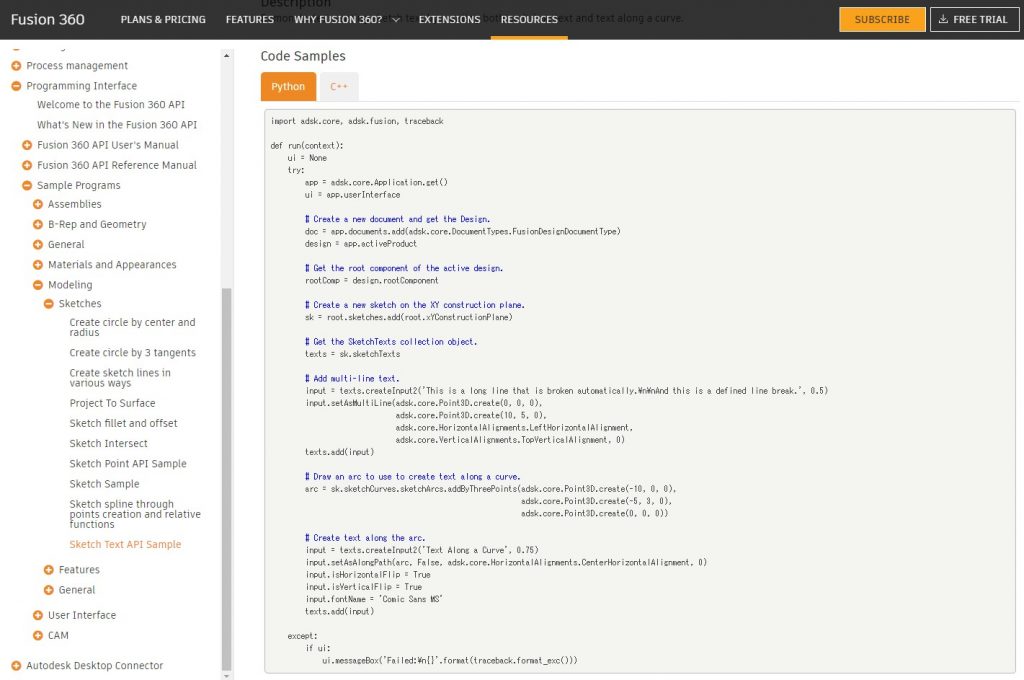
import adsk.core, adsk.fusion, traceback

def run(context):
    ui = None
    try:
        app = adsk.core.Application.get()
        ui = app.userInterface

        # Create a new document and get the Design.
        doc = app.documents.add(adsk.core.DocumentTypes.FusionDesignDocumentType)
        design = app.activeProduct

        # Get the root component of the active design.
        rootComp = design.rootComponent

        # Create a new sketch on the XY construction plane.
        sk = root.sketches.add(root.xYConstructionPlane)

        # Get the SketchTexts collection object.
        texts = sk.sketchTexts

        # Add multi-line text.
        input = texts.createInput2('This is a long line that is broken automatically.\n\nAnd this is a defined line break.', 0.5)
        input.setAsMultiLine(adsk.core.Point3D.create(0, 0, 0),
                             adsk.core.Point3D.create(10, 5, 0),
                             adsk.core.HorizontalAlignments.LeftHorizontalAlignment,
                             adsk.core.VerticalAlignments.TopVerticalAlignment, 0)
        texts.add(input)

        # Draw an arc to use to create text along a curve.
        arc = sk.sketchCurves.sketchArcs.addByThreePoints(adsk.core.Point3D.create(-10, 0, 0),
                                                          adsk.core.Point3D.create(-5, 3, 0),
                                                          adsk.core.Point3D.create(0, 0, 0))

        # Create text along the arc.
        input = texts.createInput2('Text Along a Curve', 0.75)
        input.setAsAlongPath(arc, False, adsk.core.HorizontalAlignments.CenterHorizontalAlignment, 0)
        input.isHorizontalFlip = True
        input.isVerticalFlip = True
        input.fontName = 'Comic Sans MS'
        texts.add(input)

    except:
        if ui:
            ui.messageBox('Failed:\n{}'.format(traceback.format_exc()))
実行結果の確認
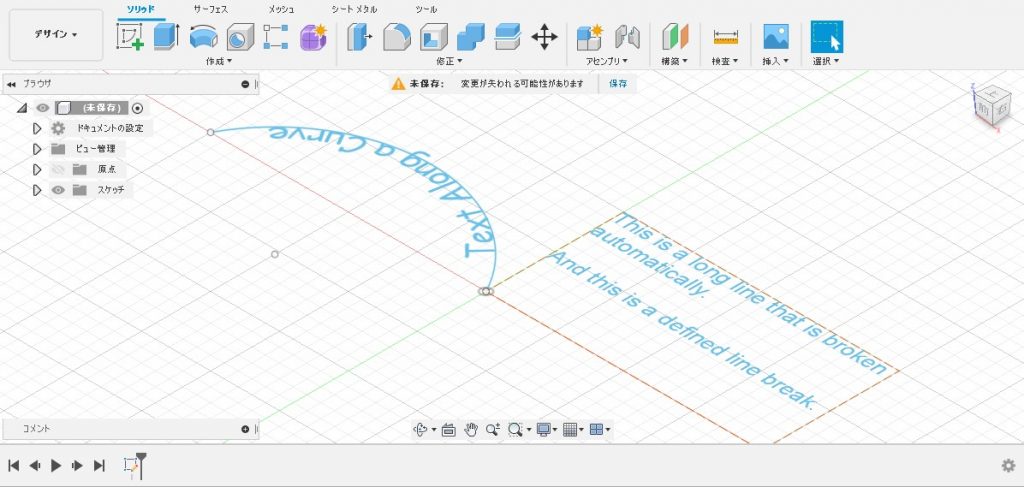
書かれているコードのままPythonスクリプトを作り、実行してみましょう。

プログラムの詳細
プログラムの中身を見ながらどんな事をしているのか確認していきます。
おまじない
1行目~11行目と43行目以降はスケッチのデザイン定番のおまじないです。
import adsk.core, adsk.fusion, traceback

def run(context):
    ui = None
    try:
        app = adsk.core.Application.get()
        ui = app.userInterface

        # Create a new document and get the Design.
        doc = app.documents.add(adsk.core.DocumentTypes.FusionDesignDocumentType)
        design = app.activeProduct
…
    except:
        if ui:
            ui.messageBox('Failed:\n{}'.format(traceback.format_exc()))
スケッチを作る
13行目~17行目ではXY平面上に新しいスケッチを作ります。(詳細は省略します)
        # Get the root component of the active design.
        rootComp = design.rootComponent

        # Create a new sketch on the XY construction plane.
        sk = root.sketches.add(root.xYConstructionPlane)
17行目が「root」になってるけど実際には「rootComp」が正しいです。
テキスト群を取得する
19行目~20行目ではテキスト群を取得します。
        # Get the SketchTexts collection object.
        texts = sk.sketchTexts
20行目の「sketchTexts」でテキスト群を取得します。
複数行のテキストを追加する
22行目~28行目では複数行のテキストを追加します。
        # Add multi-line text.
        input = texts.createInput2('This is a long line that is broken automatically.\n\nAnd this is a defined line break.', 0.5)
        input.setAsMultiLine(adsk.core.Point3D.create(0, 0, 0),
                             adsk.core.Point3D.create(10, 5, 0),
                             adsk.core.HorizontalAlignments.LeftHorizontalAlignment,
                             adsk.core.VerticalAlignments.TopVerticalAlignment, 0)
        texts.add(input)
23行目の「createInput2()」でテキストを作成します。(第一引数に文字列、第二引数に文字の高さを指定します)
24行目の「setAsMultiLine()」で長方形のテキストを定義します。(第一引数に長方形のコーナーのうち1つの点要素、第二引数に対角の点要素、第三引数に水平方向のアライメント(揃え)、第四引数に垂直方向のアライメント、第五引数に文字間隔を指定します)
※水平方向のアライメント指定は「HorizontalAlignments Enumerator」、垂直方向のアライメント指定は「VerticalAlignments Enumerator」で指定できます。
28行目の「add()」でテキスト群に定義した長方形のテキストを追加します。(引数にテキスト要素を指定します)
曲線に沿ったテキストを追加する
30行目~41行目では曲線に沿ったテキストを追加します。
        # Draw an arc to use to create text along a curve.
        arc = sk.sketchCurves.sketchArcs.addByThreePoints(adsk.core.Point3D.create(-10, 0, 0),
                                                          adsk.core.Point3D.create(-5, 3, 0),
                                                          adsk.core.Point3D.create(0, 0, 0))

        # Create text along the arc.
        input = texts.createInput2('Text Along a Curve', 0.75)
        input.setAsAlongPath(arc, False, adsk.core.HorizontalAlignments.CenterHorizontalAlignment, 0)
        input.isHorizontalFlip = True
        input.isVerticalFlip = True
        input.fontName = 'Comic Sans MS'
        texts.add(input)
31行目の「addByThreePoints()」で三点を通る円弧を追加します。(引数に三点の点要素を指定します)
37行目の「setAsAlongPath()」でパスに沿ったテキストを定義します。(第一引数に作成した円弧の曲線要素、第二引数にパスの上へ配置、第三引数に水平方向のアライメント、第四引数に文字間隔を指定します)
38行目の「isHorizontalFlip」で水平方向の反転を指定します。
39行目の「isVerticalFlip」で垂直方向の反転を指定します。
40行目の「fontName」でフォントを指定します。
まとめ
テキストの描き方2種類の紹介をしました。
サンプルでは曲線を円弧で使用してましたが線要素であればその曲線に沿って描けれると思います。
ちなみにテキストを使う場面ってどれだけあるのでしょうか?(ほとんど触っていないので使い道が思いつかない)
サンプルの紹介は全てしていませんがスケッチは一旦ここまでとして別のサンプルについても紹介しようと思います。


コメント