前回記事にて中心点と半径で円を描く方法について紹介しました。
今回は3つの線に接する円を描く方法について紹介します。
3つの線に接する円を描く
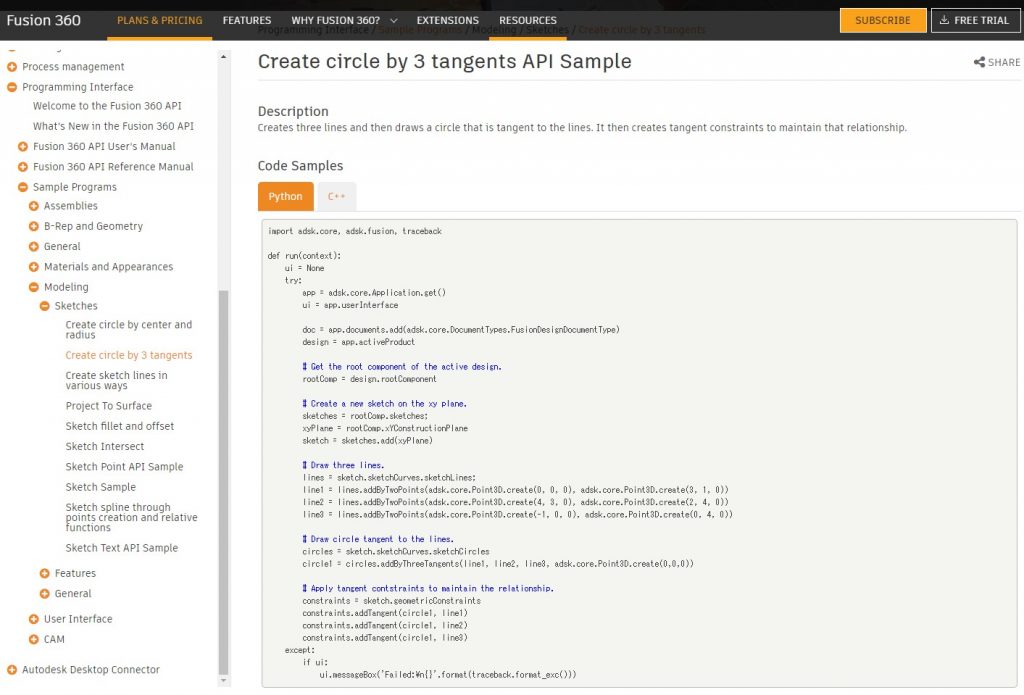
Fusion360のドキュメントにサンプルコードに3つの線に接する円を描く方法が記載されています。

import adsk.core, adsk.fusion, traceback

def run(context):
    ui = None
    try:
        app = adsk.core.Application.get()
        ui = app.userInterface

        doc = app.documents.add(adsk.core.DocumentTypes.FusionDesignDocumentType)
        design = app.activeProduct

        # Get the root component of the active design.
        rootComp = design.rootComponent

        # Create a new sketch on the xy plane.
        sketches = rootComp.sketches;
        xyPlane = rootComp.xYConstructionPlane
        sketch = sketches.add(xyPlane)

        # Draw three lines.
        lines = sketch.sketchCurves.sketchLines;
        line1 = lines.addByTwoPoints(adsk.core.Point3D.create(0, 0, 0), adsk.core.Point3D.create(3, 1, 0))
        line2 = lines.addByTwoPoints(adsk.core.Point3D.create(4, 3, 0), adsk.core.Point3D.create(2, 4, 0))
        line3 = lines.addByTwoPoints(adsk.core.Point3D.create(-1, 0, 0), adsk.core.Point3D.create(0, 4, 0))

        # Draw circle tangent to the lines.
        circles = sketch.sketchCurves.sketchCircles
        circle1 = circles.addByThreeTangents(line1, line2, line3, adsk.core.Point3D.create(0,0,0))

        # Apply tangent contstraints to maintain the relationship.
        constraints = sketch.geometricConstraints
        constraints.addTangent(circle1, line1)
        constraints.addTangent(circle1, line2)
        constraints.addTangent(circle1, line3)
    except:
        if ui:
ui.messageBox('Failed:\n{}'.format(traceback.format_exc()))実行結果の確認
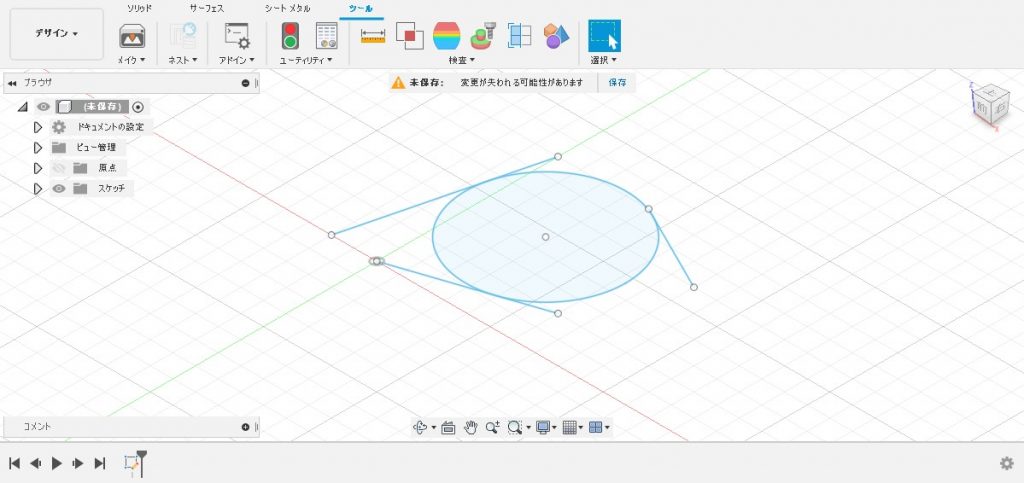
書かれているコードのままPythonスクリプトを作り、実行してみましょう。

プログラムの詳細
プログラムの中身を見ながらどんな事をしているのか確認していきます。
おまじない
1行目~10行目と35行目以降はスケッチのデザイン定番のおまじないです。
import adsk.core, adsk.fusion, traceback

def run(context):
    ui = None
    try:
        app = adsk.core.Application.get()
        ui = app.userInterface

        doc = app.documents.add(adsk.core.DocumentTypes.FusionDesignDocumentType)
        design = app.activeProduct
…
    except:
        if ui:
            ui.messageBox('Failed:\n{}'.format(traceback.format_exc()))
スケッチを作る
12行目~18行目ではXY平面上に新しいスケッチを作ります。(詳細は前回記事にて行っているので省略します)
        # Get the root component of the active design.
        rootComp = design.rootComponent

        # Create a new sketch on the xy plane.
        sketches = rootComp.sketches;
        xyPlane = rootComp.xYConstructionPlane
        sketch = sketches.add(xyPlane)
3つの直線を描く
20行目~24行目では作ったスケッチに3つの直線を描きます。
        # Draw three lines.
        lines = sketch.sketchCurves.sketchLines;
        line1 = lines.addByTwoPoints(adsk.core.Point3D.create(0, 0, 0), adsk.core.Point3D.create(3, 1, 0))
        line2 = lines.addByTwoPoints(adsk.core.Point3D.create(4, 3, 0), adsk.core.Point3D.create(2, 4, 0))
        line3 = lines.addByTwoPoints(adsk.core.Point3D.create(-1, 0, 0), adsk.core.Point3D.create(0, 4, 0))
21行目の「sketchCurves」で曲線群、「sketchLines」で直線群を取得します。
22行目~24行目の「addByTwoPoints()」で直線を作成します。(第一引数に始点要素、第二引数に終点要素を指定します)
「adsk.core.Point3D.create()」で空間上の点を作成します。(第一引数に座標のX値、第二引数にY値、ダ第三引数にZ値を指定します)
これで指定の始点、終点を結んだ直線3つをXY平面上に作成しました。
円を描く
26行目~28行目では作ったスケッチに円を描きます。
        # Draw circle tangent to the lines.
        circles = sketch.sketchCurves.sketchCircles
        circle1 = circles.addByThreeTangents(line1, line2, line3, adsk.core.Point3D.create(0,0,0))
27行目の「sketchCurves」で曲線群「sketchCircles」で円群を取得します。
28行目の「addByThreeTangents()」で円を作成します。(第一引数から第三引数に線要素、第四引数に基準となる点要素を指定します)
※第四引数の点要素については正確には分かっていないのですが第一引数から第三引数で指定した線要素により作成できる円が複数存在した場合に円を特定するために使われると思います。(今回は全て直線のため、作成可能な円は1つに決まるので第四引数の点要素はどんなものでも結果は変わりません)
※「addByThreeTangents()」の詳細は公式ドキュメントの「Fusion 360 API Reference Manual」内「SketchCircles.addByThreeTangents Method」を参照ください。
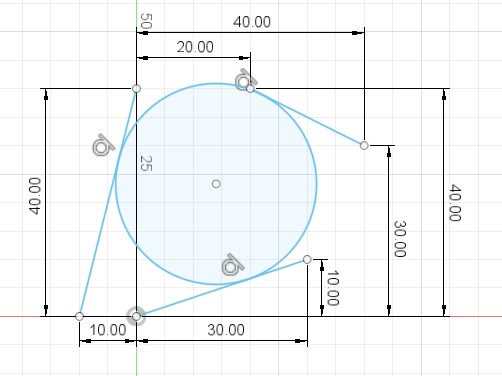
これで3つの直線に接する円をXY平面上に作成しました。
※Pythonスクリプトで入力する値はmm単位ではなく10mm(1cm)単位のようなので「8」と指定すると「80mm」の事になる。(原因は不明)
接線拘束を適用する
30行目~34行目では作った直線と円で接線拘束を適用します。
        # Apply tangent contstraints to maintain the relationship.
        constraints = sketch.geometricConstraints
        constraints.addTangent(circle1, line1)
        constraints.addTangent(circle1, line2)
        constraints.addTangent(circle1, line3)
31行目の「geometricConstraints」でスケッチの拘束群を取得します。
32行目~34行目の「addTangent()」で円と3つの直線に接線拘束を追加します。(第一引数、第二引数に接線拘束する要素を指定します)

まとめ
前回に引き続き円を描く方法について紹介しました。
今回は直線に接する円(外接円)を描く方法だったので最後に接線拘束を追加しています。
ここら辺の考え方は手作業によるスケッチの操作と全く同じ手順で行う必要があります。
まだまだサンプルソースはたくさんあるのでまずはスケッチ関係から少しずつ進めていきたいと思います。


コメント